Wednesday, June 24, 2015

In Bloom in June

I am killing time before my flight to Cumbria.    So here is a quick peek of the glories of my little garden mid June....before I set out.  


The trumpet vine in memory of my father who was fromVirginia where these vines grow abundantly in the trees.


White petunias from last year that came back.   The punk spikes are Celosia. 


Purple Lobelia and  Ageratum houstonianum. 


New leaves on Cycas ( Sego Palm in English)


Three whites:  Petunia, Lobelia and another unidentified.


Monsieur's cutting of a hanging begonia under a  dwarf maple tree


Blue Delphiniums

Wednesday, June 17, 2015

Some say the world will end in fire.....

Ok, so it has been a couple of weeks now that I did the deed of "daring do" as regards to the Asian frelon ( hornet) in my garden.    

Monsieur and I both noticed that the coal tits had not made their habitual visit to our nesting box ( nichoir) this year. 

Coal Tits are common in our area.  


 On observation of the box I found out why.  There was an impressive "bee-like" insect going into the box.   It was over an inch long! 


 Asian Hornet : Photo by ign.com

 Luckily it had left me alone when I had been trimming the bay tree. ... where we had our  nesting box wired.    I got right down from the tree and "googled" it. 

 What I found out made me "mad as a hornet"  because I am pretty sure, that being carnivorous, the Asian hornets had already destroyed the wild honeybee nest .... the one that has been on our property for over 20 years...the one that each year produced several swarms and who's residents enjoyed the pesticide free garden I have created. ...BECAUSE ASIAN HORNETS EAT BEES! 

The "bee guy" that we had called from "S.O.S. Assaim" has profited from our swarms of bees for several years now.  He would come with his assistant and load the swarm into a new home.   It was he who had told us that our hive was a combination of wild and commercial honeybees.  And now they have disappeared probably due to the Asian hornet. 


So I sent a mail to a local association in France dedicated to controlling the Asian Hornet and asked how to go about eradicating the hornet's nest  without using poison.   

 A helpful fellow wrote back a week later and said that I should put on two layers of clothes, a helmet with a net and stuff a wet paper plug into the hole of the nichoir. ...then put it in the sun until the beasts were dead. 

  But hey, he was a week too late telling me this.  I had already decided to act before I heard from him.   I didn't want the nest to get bigger and I didn't want offspring starting to be produced. 

 As far as I could tell from observation, the activity was from a single hornet coming and going and her movement stopped in the evening and didn't start until around 10 in the morning.  

So I waited until a friend was here ( Monsieur was away), then I climbed the ladder early in the morning ( without any protective clothes).  Yes,  I made sure my friend was around in case I had to be rushed to the hospital.  These insects can sting multiple times and have been known to kill people...(at least in China! ) 

 So foolishly perhaps, without any special clothes,  I  sealed the box with a piece of strong packing tape in one swift movement.    I then took the whole box down out of the tree with the hole taped up. 

 I listened and something was moving inside.  I had at least one hornet  

.....but how to kill this evil queen.  

  I thought of Robert Frost's poem.


Fire and Ice by Robert Frost
Some say the world will end in fire,
Some say in ice.
From what I’ve tasted of desire
I hold with those who favor fire.
But if it had to perish twice,
I think I know enough of hate
To say that for destruction ice
Is also great
And would suffice. 

Frankly,  leaving it in the heat to die seemed more cruel than the second option. .....so I cleared out the second drawer of the freezer and put the whole nichoir in there for four hours.  Clever me!  

Finally I had enough nerve to open it.  And here is what I found:   the paper nest was only about 10 cm across.   Whew, I had gotten it early.  And there was just a sole hornet. 
Photo by Mary M Payne


 Next year beginning in February,  when the nest building starts, I am going to devise a trap for the hornets.    I can't support this bee eater in my garden again and I want to do my part for the bee population! 

      I hear hornets like beer or wine and that is what I will put in my "piege". ...maybe wine since after all, we are in France! 

Monday, June 15, 2015

Bike : Chine collé


Chine Collé with Michelin Guide: Mary Payne


 As I have explained in an earlier post,  Chine collé is a technique in which one can affix a piece of paper ( usually colorfast Japanese tissue paper)  under a print so that it becomes the background as the print is laid down. 

Being in France, old Michelin guides are easy to come by so I cut up a piece of the map and glued it with traditional glue starch to make this print. My plate had already been prepared as an aquatint of a bike and shadow inked in black. 

Just the printing process required that I:

1.  Wet the paper and the map thoroughly and set it between two sheets of old newsprint to soak for 10 minutes. 

2.  Inked my copper "plaque" with oil based black, wiped it with three different pieces of tarlatan and hand wiped the plate and set it aside. 

3.  Soaked the BFK Rives receiving paper for about 10 minutes,  dried it with a towel on both sides until it was damp.

4.  Spread glue with a brush... onto the damp paper surpassing the area of the print.  

5.  Removed the damp piece of map and placed it face down on top of the inked copper plate. 

6.  Centered the plate on the press and then measured off the amount of margin I wanted on each side in order to center the paper. 

7.  Dropped the paper on top of the plate (and map piece) and placed the blankets ("linge")over the whole. 

8.  Turned the crank on the press to run the plate through the press. 

9.  Slowly peeled back the paper (in case the glue was not adhering to the paper) and pulled off the print. 

The second time I tried the traditional paper which  is finer than traditional tissue paper to be used under the inked plate.  This time I spattered it with ink before using it.  Next time I will use a wash of acrylic instead of ink because that will not mix with the glue.  I was being absent minded again when I grabbed for the ink.   Also I needed to dry the finished print between two sheets of blotter paper under a pile of books for at least a week.  I didn't do that either and so I have a ripple in the middle.  I will have to rewet it and try again.  Print making teaches Buddhist "mindfulness" if you stay at it long enough. 

Chine collé : Mary Payne


Sunday, June 14, 2015

End of Year Evaluation : Gravure


It is a lazy Sunday and there is a noisy summer storm in progress.  I have the summer off from the printmaking class and I am in the process of looking through what I have produced...  seeing what was successful and what was not. 

   Examining the finished work,  I can see that there is room for improvement and some prints I will try again.      Too bad archival paper is costly....as it is difficult for me to actually put prints in the "poubelle".   However,  if I were doing an edition for sale , many prints would most certainly end up as trash.   


The biggest problem I seem to have in my current classroom situation is "impatience".     The large press in the studio at school is coveted by all the students as it takes large paper (preferred for exhibition) and is more accurate for lino prints than the book press we have at our disposal.  But though the large press prints both metal and lino, the instructor is reluctant to re-regulate it for each new class every three hours. 


To print linoleum blocks on the large press,  it is required that one  take away the blankets and substitute runners the height of standard linoleum.  The instructor must also change the tension on the press.  Since she is the only one allowed to make these adjustments, it is up to her if we get to print our preferred plaque at class each Wednesday.  


  I think when she puts on the "green light" for us "lino" students to use the large press....I get excited to do as many as possible. 


Lesson number one:   Slow down and concentrate on each print each step of the way. ...  better to do just one then have to throw some away.


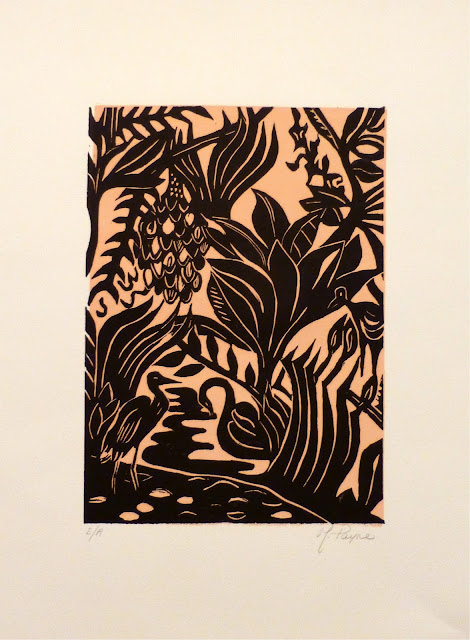
I have a single two toned print to show you today.    This is taken from a gouache painting I did years back and I intended to make it into a linoleum reduction print.   However, I found that the size of "lino" I had chosen to work with this year was too small for the number of details required and the number of colors I wanted.  


Painting by Mary M Payne
 I have carved the painting as a simple lino and printed it below in a two tone print about the size of standard French A4 paper.  The coral color oil based ink went on and dried for a week before I put over the black layer.  

 It is also difficult to roll out two colors at school as we have a very small glass area that everyone shares.    Otherwise I would have tried "wet on wet" which means printing the black immediately after the background. 


 I reversed the print on this design as I didn't feel that was critical to the result.   I have experimented with several new techniques this year.  This one reminds me of a silhouette ...as done by paper cut artists like Kara Walker.   http://learn.walkerart.org/karawalker


Linocut engraving by Mary M Payne